Choosing the Right Garage Floor Tiles for Waterfall City Climate
Understanding Humidity and Moisture Resistance
If you live in Waterfall City, your garage floor has seen things. Humidity creeps in. Moisture finds every crack. Choosing the right garage floor tiles waterfall city residents can trust means understanding how water behaves underfoot. Some materials absorb. Some repel. You want the repelling kind.
Consider how often the air feels thick. That sensation is your clue. Tiles with low porosity handle this climate better. They stop dampness from seeping into the concrete below.
Maybe you noticed white stains or a musty smell already. Those are clues. Not all tiles respond the same way.
- Porcelain resists moisture well.
- Concrete tiles soak up humidity.
- Vinyl can trap water underneath.
That difference matters. Many garage floor tiles waterfall city homeowners choose based on looks alone, then regret it during the rainy season. Read the specs before you fall in love with a colour.
Heat Tolerance for Varying Seasons
In Waterfall City, summer surface temperatures can exceed 40 degrees Celsius. Winter nights pull the same slab down toward freezing. That swing stresses every material in your garage. I have watched cheap tiles bow and fade after one summer.
Quality garage floor tiles waterfall city homeowners choose must handle that cycle without warping. Porcelain with a full-body glaze resists UV fading. Dark tiles store heat and turn the garage unbearable by late afternoon. Light finishes reflect the sun and stay usable.
Three properties separate durable tiles from disappointing ones:
- Thermal expansion rating
- Surface temperature stability
- UV resistance of the finish
Those numbers matter more than the pattern. The right surface keeps its shape and shade through every season. That is the difference between replacing tiles and parking on them for a decade!
Slip Resistance for Wet Conditions
Rainwater follows car tyres into every garage in Waterfall City. That film of water turns a smooth surface into a hazard. The coefficient of friction matters more than the colour. A wet pendulum test rating of 0.6 or higher gives your feet purchase when the slab stays damp after a storm.
Textured finishes outperform polished ones. Tumbled stone and matte porcelain create micro-grip, though some tiles feel rough yet still slide once soap or oil mixes with water. Check the R11 or R12 rating; these numbers matter in South African garages.
- R10 for light foot traffic
- R11 for standard garage use
- R12 for zones that stay wet
Garage floor tiles waterfall city residents pick must hold grip even after water dries and leaves dust film on the surface. That dry layer causes more slips than standing water ever will.
Top Materials and Styles for Residential Garage Floors
Interlocking PVC Tiles
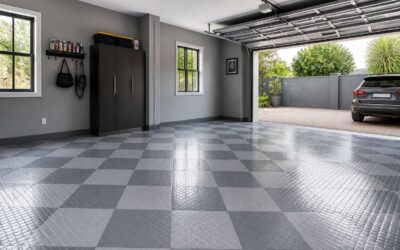
The garage floor is the hardest working surface in your home, yet it often looks forgotten. Interlocking PVC tiles change that! They snap together without adhesive, giving you complete control over the finish. For garage floor tiles waterfall city residents have options ranging from subtle grey matte finishes to bold carbon fiber patterns. The material is dense enough to handle jack stands and tool boxes without denting.
- Wood look planks add warmth and hide scuffs well.
- Diamond plate texture offers a mechanic’s aesthetic.
- Smooth solid tiles read as a polished, modern space.
Each style uses the same interlocking system, so you can mix sections for a custom layout. When planning garage floor tiles waterfall city you should consider how light and shadow play across the surface. The tiles leave room for expansion, which keeps the level stable year after year.
Polypropylene Diamond Plate Tiles
Polypropylene diamond plate tiles deliver a distinctly tougher voice for the garage floor. Unlike softer PVC formats, this material resists indentation with a firmer backbone, which suits anyone who rolls heavy tool chests or drops engine parts. For garage floor tiles waterfall city, the raised pyramid pattern creates channels that catch dust and grit, keeping the main walking surface tidy.
The faceted surface catches light from different angles as you move, giving the room a quiet kinetic energy. Polypropylene does not absorb oils or brake fluid, so cleanup becomes a simple wipe rather than a stain project. Planks and squares both carry the diamond pattern, and the aligned grid gives the space a deliberate, engineered look.
I have installed these in show garages and weekend workshops across garage floor tiles waterfall city. The diamond plate profile remains a practical choice because it serves a real function. Your floor communicates its purpose before anyone steps inside.
Rubber Tiles for Shock Absorption
Rubber tiles change the feel of a garage floor. They absorb shock from dropped tools and heavy foot traffic, which matters in garage floor tiles waterfall city where homes often sit close together. The softness is noticeable immediately, especially if you stand for long stretches while fixing a lawnmower or detailing a car.
I installed a thick rubber mat system in my own garage, and the difference is real. The floor gives underfoot, so my knees no longer ache after a weekend of projects. These tiles also deaden sound. That is a quiet benefit you do not expect until you hear it.
Decorative Coin and Texture Patterns
Decorative coin patterns hide daily grime. A coin pressed tile has raised circles that catch light differently, so scuffs and dust stay less visible than on a flat surface. For garage floor tiles waterfall city, this matters because garages double as workshops and storage zones.
Texture patterns go beyond the coin style. Pebbled finishes, slate inspired textures, and crosshatch surfaces change the feel of the room. These patterns provide grip through the surface shape itself, without a coating that loses its bite.
Materials pair with patterns in distinct ways:
- PVC blends accept detailed textures without cracking
- Polypropylene composites keep crisp edges on high relief patterns
- Rubber hybrids add bounce while retaining the visual texture
I have watched homeowners use one pattern for the parking bay and another near the workbench. That contrast adds character without cost. Comparing garage floor tiles waterfall city options reveals how much texture changes the final look!
Preparing Your Waterfall City Garage Floor for Installation
Cleaning and Degreasing the Concrete Base
Consider this: 68% of garage floor failures trace back to poor surface prep, according to a 2021 industry survey. That statistic feels true in Waterfall City where humidity conspires with old engine oil to create a sticky mess. Before you lay garage floor tiles waterfall city, the concrete base demands a serious scrub. Degreasing is not optional decoration.
- Sweep away loose debris and dust
- Apply a heavy duty alkaline degreaser
- Agitate with a stiff brush
- Rinse thoroughly with clean water
- Allow 48 hours for complete drying
The concrete should look worse before it looks better. That slick rainbow sheen is your enemy. You want a surface that would make a school janitor nod with approval. Any residue left behind creates a bump under your tiles, and that bump shifts with every footstep you take.
Repairing Cracks and Surface Imperfections
A Waterfall City garage floor that appears sound at a glance often hides hairline fractures. The clay soil below swells with seasonal rain and contracts during dry months, stressing the slab until cracks surface. Laying garage floor tiles waterfall city over that damaged base ensures the fissures migrate upward through the tile joints within a year.
Repair begins with a hammer and cold chisel. Chop out loose material until solid concrete appears, then undercut the edges so the patch locks in rather than resting on top. Dampen the cavity before packing in a polymer-modified compound in thin layers.
- Wait for each layer to set before adding the next.
- Finish flush with the surrounding surface.
- Allow 24 to 48 hours for a full cure.
Spalled areas need the same treatment. The finished floor must present one flat plane, because any depression or ridge becomes a rocking tile beneath your garage floor tiles waterfall city.
Measuring and Planning the Layout
A tape measure does not lie. Waterfall City garages often sit out of square by several centimetres, and that reality decides where every tile lands. I always measure the floor at six points first, because those high spots anchor the entire grid.
Plan the layout before you open a single box of garage floor tiles waterfall city. Here is a simple process:
1. Snap a chalk line parallel to the longest straight wall.
2. Measure 60 centimetres from that line and snap another.
3. Repeat until you reach the opposite wall.
4. Mark the final row, which will carry your cut tiles.
The room will not match the tile perfectly. Door frames, floor drains, and water pipes interrupt the grid. A pencil sketch of the garage with those obstacles marked saves hours of guesswork. Dry lay a test row from your starting wall to the door, then adjust the chalk lines until the cuts look clean and the full tiles land where you walk most often. Once the grid is set, installing garage floor tiles waterfall city becomes simple. You just follow the lines you already drew!
Acclimating Tiles to Local Temperature
The temperature in Waterfall City shifts between Highveld winter chill and summer afternoon heat. Tiles stored in a warehouse carry that warehouse’s climate, not yours. Lay them straight from the truck and the material will expand or contract on your garage floor.
Acclimating is simple. Stack the boxes in the garage for at least 48 hours before installation. Let the garage floor tiles waterfall city settle into the ambient conditions. The polymer needs time to reach equilibrium with the concrete.
A few precautions while you wait:
- Keep the boxes off the concrete using timber spacers.
- Leave the cardboard sealed to slow the temperature shift.
- Stack them in the installation room.
The local climate demands patience. A tile that snaps into place on a cool morning may buckle by afternoon when the sun heats the slab. Give the material its hours, and the garage floor tiles waterfall city will lock together without protest.
Gathering Necessary Tools and Accessories
Before a single tile leaves its box, the concrete slab demands one final inspection. Run your palm over the surface to detect fine grit left after the deep clean. Those particles sit between the polymer and the concrete. Check for damp patches, especially after summer thunderstorms. The slab must be dry before the first row of garage floor tiles waterfall city clicks into place.
The right tools separate a frustrating afternoon from a smooth session. Gather these before opening the first carton:
– Rubber mallet for seating interlocking edges
– Sharp utility knife and straight edge for clean cuts
– Chalk line to mark reference points
– Knee pads for extended kneeling
– Heat gun for cutting around support columns
Keep your workstation near the installation point. Every tool within arm’s reach means fewer interruptions and less risk of stepping onto a partially laid section of garage floor tiles waterfall city.
Step-by-Step Installation Guide for DIY Enthusiasts
Laying the First Row Along the Garage Door
Laying the first row alongside the garage door is where precise hands earn their keep. A laser line or chalk snap gives you a straight reference. For garage floor tiles waterfall city, this edge must sit parallel to the door track, with a small expansion gap left against the wall.
- Dry fit the first tile at the corner.
- Press down firmly until the interlocking tabs seat.
- Work outward, checking the gap every third tile.
Your weight matters here. Kneel on each tile as you go. A tile that appears level to the eye can still sit a millimeter high, enough to trip a castor wheel later.
Cutting Tiles for Edges and Obstacles
Some sections will never align with a factory edge, especially around support columns, floor drains, or door jambs. These obstacles demand a different approach. Lay the tile over the gap and trace the obstruction with a pencil. Then follow this sequence:
1. Score straight lines with a sharp utility knife, pressing against a metal straightedge.
2. Snap the tile over a hard edge for a clean break.
3. Use a jigsaw with a fine tooth blade for curved cuts.
4. Sand any burrs with fine grit paper.
Work slowly. Speed builds friction heat, which softens the polymer and creates a ragged result. For garage floor tiles waterfall city, the cutting step decides whether the floor looks intentional or improvised. Trim slightly smaller than the traced line. A few millimetres of breathing room around walls and obstacles prevents pressure buildup when temperatures climb. Garage floor tiles waterfall city demand patience at this stage.
Connecting Tiles Securely
Connecting tiles securely is the critical step in any installation. For garage floor tiles waterfall city, this action unifies the entire floor. Begin by setting each tile at an angle, easing the tab into the groove, then pressing flat till the lock clicks. Work in small sections, checking each seam immediately.
Use this sequence:
- Align the tab with the groove at a 45 degree angle.
- Lower the tile evenly, avoiding one side dropping first.
- Press along the seam until you hear a snap.
- Tap stubborn joints with a rubber mallet, moving from centre to edge.
After installation, inspect weekly for loosening. For garage floor tiles waterfall city, consistent connection prevents shifting. Temperature changes cause movement, so leave a few millimetres at the walls, ensure every internal joint remains firm. The floor remains stable for years under heavy use.
Installing Edge Trim and Transition Strips
Transition strips and edge trim handle the perimeter, the area where tiles take the most punishment. For garage floor tiles waterfall city, these profiles create a clean break between the tiled floor and wall, doorway or step.
Start with the transition strip. Measure the doorway, cut the strip to length, and fix it to the subfloor before locking the final tile row against it. Then run edge trim along the walls, anchoring the track with masonry screws.
- Slide the track under the edge of the outermost tile.
- Snap the trim cap onto the track.
- Tap the cap down with a rubber mallet from centre to end.
Check each length for flush alignment, since a raised cap catches wheels and feet. Properly seated trim also keeps moisture from creeping under the tile locks. That is what keeps garage floor tiles waterfall city stable for years!
Handling Expansion Gaps
Expansion gaps perform a quiet duty. They give your garage floor tiles waterfall city room to shift when temperatures climb and fall. Without them, locked tiles press against the walls, lifting and warping over time. A 3 mm gap around the perimeter is typically enough for most PVC and polypropylene tiles.
To handle gaps like a seasoned installer, follow this sequence:
- First, lay spacers along each wall before installing the border tiles. These plastic wedges hold a consistent gap as you work.
- Next, complete the tile field, leaving all spacers firmly in place until every lock is seated.
- Once the full layout is connected, remove the spacers and sweep the gap clean of debris.
Then fit the edge trim over that open seam. The trim cap conceals the gap while still permitting movement underneath. That space is not wasted. It is the breathing room your garage floor tiles waterfall city need to remain flat and stable through every season.
Final Inspection and Adjustments
Once the edge trim is seated, the installation looks complete. But the final inspection decides whether your garage floor tiles waterfall city will endure. I always walk the whole surface and run my palm across each seam. A smooth transition means the locks are holding. A raised lip signals a connection needing more pressure.
Check alignment against the original layout marks. Slight shifts happen during installation, especially near doorways. Re-engage loose corners by pressing and sliding the tile into position. For stubborn tiles, a rubber mallet with a protective block works well.
Use this sequence for the final check:
- Walk every row, listening for clicks or movement.
- Run your hand over each seam to find raised edges.
- Press down on any suspect tiles to seat them fully.
- Confirm the expansion gaps stay clear of debris.
Rinse the surface to reveal low spots. Water pools where tiles dip. Your garage floor tiles waterfall city should feel solid underfoot. When every tile sits flush, the work is done.
Maintaining Your Garage Floor Tiles in Waterfall City
Routine Sweeping and Mopping
Your garage floor tiles in Waterfall City handle more daily abuse than any other surface in your home. Fine grit from tyres abrades the finish. Dust settles into the seams. A five minute sweep each week prevents that wear from becoming visible.
Mopping keeps the colour uniform and the surface protected. Warm water with a pH neutral cleaner works best. Harsh chemicals will strip the protective layer over time.
- Sweeping in one direction keeps grit from lodging in the seams.
- A microfiber mop lifts residue better than a traditional string mop.
- A final rinse with clean water prevents streaking.
I’ve seen floors ruined by skipping this step. The routine takes ten minutes. It preserves the garage floor tiles in Waterfall City and keeps them looking new for years!
Removing Stains from Oil and Chemicals
Oil from a sump pump or hydraulic jack finds its way onto the surface before you notice. Chemical spills, paint stripper, or even battery acid create dark patches that appear permanent. Garage floor tiles waterfall city are manufactured with a dense protective layer, but the seams between tiles remain vulnerable when a spill sits overnight.
Immediate action is key. Absorb fresh oil with a rag, then spray the stain with a degreaser diluted in warm water. Leave it for a few minutes. Scrub with a nylon brush, moving from the outside of the stain toward the centre. Rinse well.
For dried chemical residue, a plastic scraper removes the bulk. A baking soda paste lifts the remaining discolouration. The tiles hold their colour, and the garage stays presentable.
Seasonal Care for Extreme Weather
Seasonal care for garage floor tiles waterfall city households often starts with the change from summer storms to winter drought. The shift matters. After heavy rain, push pooled water toward the drain before it lingers in the seams. That one step saves you from a lot of scrubbing later! When winter dust settles in, a dry sweep prevents grit from grinding into the surface.
Most homeowners forget the heat. Waterfall City summers can push surface temperatures high enough to soften cheap materials. Your garage floor tiles waterfall city should stay rigid, but a quick check after a hot spell reveals any trouble. Look for warping near the garage door where the sun hits hardest.
Once a season, lift a corner tile and inspect the subfloor.
- Clear debris from the edges.
- Check for moisture patches.
- Press loose tiles back into place.
That small routine keeps the floor stable through the extremes.



0 Comments